AVRでneopixel ringを光らせる
2018/07/26
前回はGEMMAというArduino互換機を使ってneopixel ringを光らせました。
ArduinoはAVRというチップで動いています。AVRチップはサイズが様々あり、価格も50円〜とリーズナブルです。毎回何か作品を作るたびにArduinoを購入するのはかなりお金がかかってしまいますが、AVRチップを使えばかなりお金を抑えることができます。
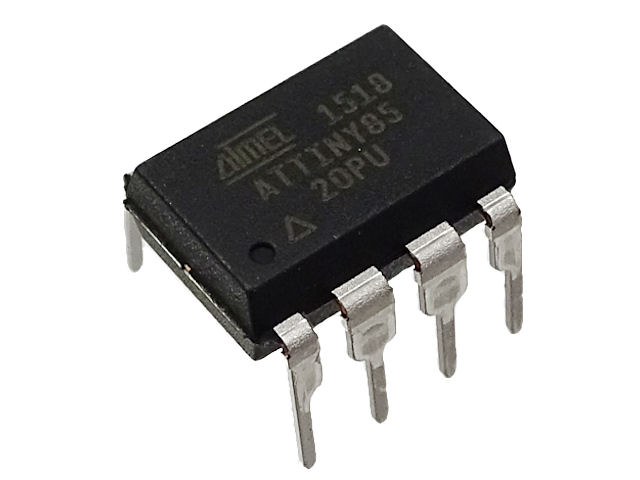
ということで、AVRチップの一つであるATTINY85-20PUをつかってLチカとNeoPixel Ringを試して見たいと思います。
設定ファイルのダウンロード
まずは設定ファイルをダウンロードします。
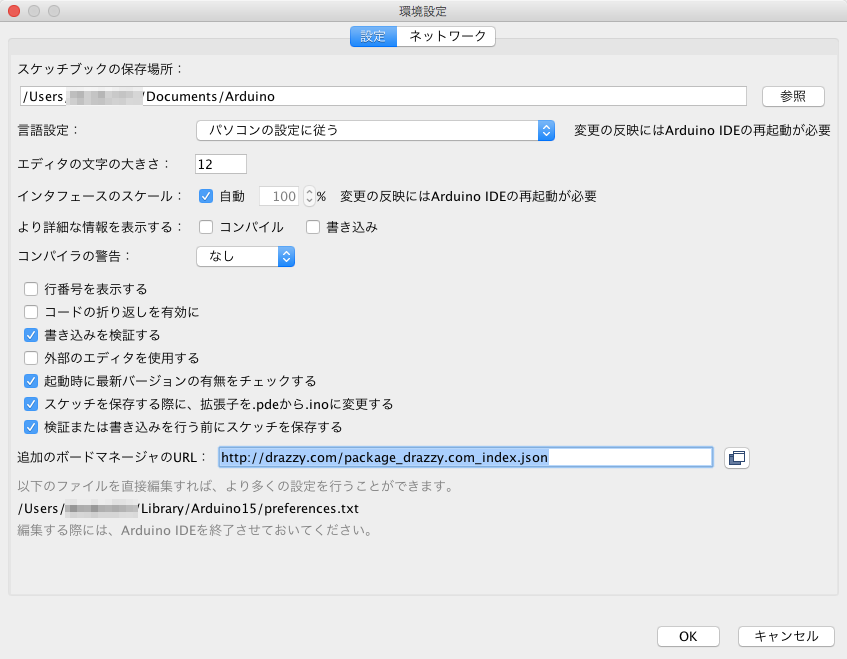
Arduino IDEを起動し、「Arduino>Preferences」で追加のボードマネージャのURLに以下を設定します。
|
1 |
http://drazzy.com/package_drazzy.com_index.json |
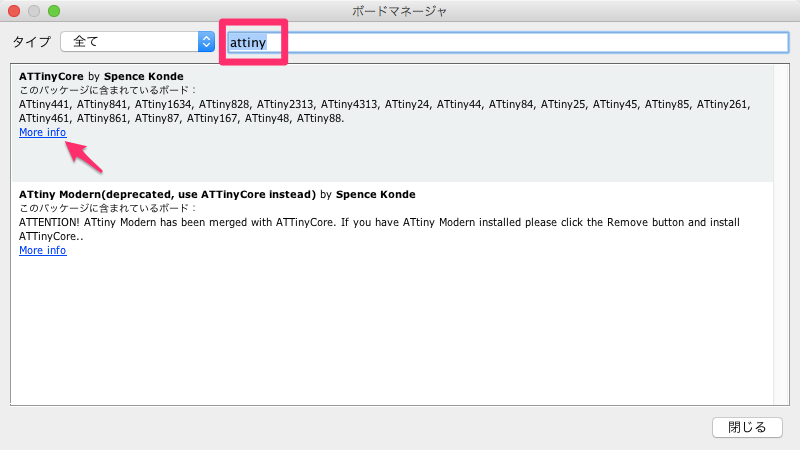
次に「ツール>ボード>ボードマネージャ」で、attinyを入力し、「ATTinyCore」を選択し、インストールします。「More info」をクリックしたらインストールボタンが表示されます。
次にArduino unoをAVR書き込み用に変更します。「ファイル>スケッチ例>11.ArduinoISP>ArduinoISP」を選択します。
ツール>ボード>ATiny25/45/85 を選択します。
シリアルポートがArduino UNOを選択していることを確認します。(他の機材などを接続している・接続したことがあると別のものが選択されている場合があります。)
ツール>書込装置>Arduino as ISP を選択します。
とっても似た名前でArduinoISPがありますが、間違えないようにしてください間違えると書き込み時に以下のエラーが出ます。
|
1 2 |
avrdude: Error: Could not find USBtiny device (0x2341/0x49) avrdude: Error: Could not find USBtiny device (0x2341/0x49) |
その後、マイコンボードに書き込みボタンを押下します。
配線
配線はこちらのサイトを参考にしました。
実際に実装したてみた図
Neopixel Ringを光らせる
次にNeopixel Ringを光らせます。LチカではLEDをこちらのD3に繋いでいました。これをNeopixel RingのD1に接続します。また電源はArduinoの余っている3.3VとGNDから引っ張ります。
 コードは以下を使用しました。また、このコードを使用するにあたって、Adafruit_NeoPixelのライブラリを入れておく必要があります。
- githubからダウンロード
https://github.com/adafruit/Adafruit_NeoPixel
右上にあるClone or Downloadからzipでダウンロードできます。 - ダウンロードしたファイルを解凍して、リネーム。
ディレクトリ名がAdafruit_NeoPixel-masterになっているとおもうのでAdafruit_NeoPixelに変更する - ディレクトリをライブラリに入れる。
ArduinoIDEのアプリからArduino>Preferenceを選択すると表示される、スケッチブックの保存場所までいくと、librariesというディレクトリがあるので、そこに先程のディレクトリAdafruit_NeoPixelを入れます。
http://www.instructables.com/id/A-Very-Quick-NeoPixel-16-Ring-Test-With-Arduino-Un/
|
1 2 3 4 5 6 7 8 9 10 11 12 13 14 15 16 17 18 19 20 21 22 23 24 25 26 27 28 29 30 31 32 33 34 35 36 37 38 39 40 41 42 43 44 45 46 47 48 49 50 51 52 53 54 55 56 57 58 |
#include <Adafruit_NeoPixel.h> #define PIN 3 // Parameter 1 = number of pixels in strip // Parameter 2 = pin number (most are valid) // Parameter 3 = pixel type flags, add together as needed: // NEO_KHZ800 800 KHz bitstream (most NeoPixel products w/WS2812 LEDs) // NEO_KHZ400 400 KHz (classic 'v1' (not v2) FLORA pixels, WS2811 drivers) // NEO_GRB Pixels are wired for GRB bitstream (most NeoPixel products) // NEO_RGB Pixels are wired for RGB bitstream (v1 FLORA pixels, not v2) Adafruit_NeoPixel strip = Adafruit_NeoPixel(20, PIN, NEO_GRB + NEO_KHZ800); void setup() { strip.begin(); strip.setBrightness(30); //adjust brightness here strip.show(); // Initialize all pixels to 'off' } void loop() { rainbowCycle(20); } // Fill the dots one after the other with a color void colorWipe(uint32_t c, uint8_t wait) { for(uint16_t i=0; i<strip.numPixels(); i++) { strip.setPixelColor(i, c); strip.show(); delay(wait); } } // Slightly different, this makes the rainbow equally distributed throughout void rainbowCycle(uint8_t wait) { uint16_t i, j; for(j=0; j<256*5; j++) { // 5 cycles of all colors on wheel for(i=0; i< strip.numPixels(); i++) { strip.setPixelColor(i, Wheel(((i * 256 / strip.numPixels()) + j) & 255)); } strip.show(); delay(wait); } } // Input a value 0 to 255 to get a color value. // The colours are a transition r - g - b - back to r. uint32_t Wheel(byte WheelPos) { if(WheelPos < 85) { return strip.Color(WheelPos * 3, 255 - WheelPos * 3, 0); } else if(WheelPos < 170) { WheelPos -= 85; return strip.Color(255 - WheelPos * 3, 0, WheelPos * 3); } else { WheelPos -= 170; return strip.Color(0, WheelPos * 3, 255 - WheelPos * 3); } } |
でかいリングもできた。GEMMAじゃなくてATTINY85使ってる pic.twitter.com/mrGjetVlXj
— Daijiro (@dorako321) 2017年3月12日
これで格安ウェアラブルアクセサリができそうです。GEMMAと違って物理スイッチやバッテリー接続ののメスソケットを用意しないといけないので、少し面倒ですが・・。購入を忘れたので組み立てはまた別途。
その他
書き込み中に以下の表示が出た場合、Arduino unoのリセットを押すか、スケッチ例からArduinoISPを書き込んでいない可能性があります。
|
1 2 3 4 5 6 7 8 9 10 11 12 13 14 15 16 |
avrdude: stk500_recv(): programmer is not responding avrdude: stk500_getsync() attempt 1 of 10: not in sync: resp=0x00 avrdude: stk500_recv(): programmer is not responding avrdude: stk500_getsync() attempt 2 of 10: not in sync: resp=0x00 avrdude: stk500_recv(): programmer is not responding avrdude: stk500_getsync() attempt 3 of 10: not in sync: resp=0x00 avrdude: stk500_recv(): programmer is not responding avrdude: stk500_getsync() attempt 4 of 10: not in sync: resp=0x00 avrdude: stk500_recv(): programmer is not responding avrdude: stk500_getsync() attempt 5 of 10: not in sync: resp=0x00 avrdude: stk500_recv(): programmer is not responding avrdude: stk500_getsync() attempt 6 of 10: not in sync: resp=0x00 avrdude: stk500_recv(): programmer is not responding avrdude: stk500_getsync() attempt 7 of 10: not in sync: resp=0x00 avrdude: stk500_recv(): programmer is not responding avrdude: stk500_getsync() attempt 8 of 10: not in sync: resp=0x00 |


